Wednesday, January 30, 2008

Chocolate coverd strawberries instead of flowers!


I LOVE to make strawberry bouquets for people for special occasions! They are so fun to make (regular chocolate, I have given up on white chocolate) and they are definitely something that will stand out from other gifts! For some I have tried to get creative with decorating the strawberries with sliced almonds or chocolate chips. The only down side if this project/gift is transporting it. I would definitely recommend delivering it with a friend who is willing to drive or hold onto it. If that is not possible, I did take one on a 4.5 hour car ride by tightly securing it in a foam cooler with some strategically placed bamboo skewers!

To make:
Use a double boiler or a bowl (that can handle high temperatures) over a pan of boiling water. Melt the chocolate in the bowl. I would not recommend adding anything to the chocolate that would water it down. Then place a strawberry on a bamboo skewer and dip it in the chocolate. I make sure I have a cup or vase in the freezer waiting, and then I put the chocolate covered strawberry into the freezer. I keep repeating this until the cup or vase I am using is full. I take that one out and put it in the fridge and get a new cup ready. I continue this until I run out of strawberries or chocolate (whichever comes first).
I have made the vase/basket a few ways. For most I have used a basket from the craft store that I filled with floral foam and covered with moss. The last time I decided to make a strawberry bouquet, I used a pitcher and filled it with M&Ms. Both work great!
These are all bouquets that I have made over the years. I wanted to wait to post about them after I have made another, but I decided it would be a great idea to share them now. They would make a great gift idea for Valentines Day, or a fun centerpiece for a V-day party! The next time I do this I will have to take more pictures and post a step-by-step guide. I haven't made another since I became a blogger!

Tuesday, January 29, 2008

Recycled and FABULOUS!


I came across these beautiful stools today. They are made by a skate boarder in Japan. The site is called core (Composed Of Real Elements). Core contains quite a few products made from recycled (retired) skateboards. Most of the other stuff on the site is jewelery, and these stools are by far my favorite!

Sunday, January 27, 2008

The rug gets some color!


After some consideration, I decided to add color to the rug I am making for my living room. I love the idea of a super plush white shag rug, but I keep fearing that it will get dirty too quickly. I am spending a lot of time on it and the last thing I want is to be afraid to walk on it. As of right now, I might keep the white band at one side. If I get sick of it I can slowly add color into that portion. Even my dog Bonnie gave the change her seal of approval!

Bicycle


I wish I could afford the Cynthia Rowley beach cruiser. They are adorable! They could be a fun inspirtaion for a revamp of an old bike. Hmmmmm....

Wednesday, January 23, 2008

Bueller...


I ordered a few prints from Bueller on Etsy. Yesterday, I finally got them in the mail, and I LOVE them! This girl definitely knows how to photograph the beach (among many other things)! I cannot wait to hang these. I am currently debating between a straight grid or mismatched frames in an unplanned grouping.

Monday, January 21, 2008

Snowball Cupcakes


I decided to try to make a snowball cupcake modeled after the Hostess Snowball Snack cakes. Not only did they turn out adorable, they are delicious too! I cannot wait to share them at work tomorrow!

Chocolate Cake Recipe:
1 3/4 cups all purpose flour
2 cups sugar
3/4 cup unsweetened cocoa
1 1/2 teaspoon baking soda
1 1/2 teaspoons baking powder
1 teaspoon salt
2 eggs
1 cup milk
1/2 cup vegetable oil
1 teaspoon vanilla
1 cup boiling water

Preheat oven to 350 degrees. In a large bowl combine flour, sugar, cocoa, baking soda, baking powder and salt. Mix together with a fork then set aside. In small bowl combine eggs, milk, oil and vanilla. Beat well with hand mixer. Slowly add boiling water to wet ingredients. Add wet ingredients to flour mixture and fold and stir until smooth. Pour batter into papers. I made minis, and filled the papers about 2/3 full. Bake for 15 minutes. Remove cupcakes from pans and cool on racks.

Vanilla Buttercream Frosting Recipe:
3 cups confectioners' sugar
1 cup butter
1 teaspoon vanilla extract
1 to 2 tablespoons whipping cream

With a mixer, mix together sugar and butter. Mix on low speed until well blended and then increase speed to medium and beat for another 3 minutes.
Add vanilla and cream and continue to beat on medium speed for 1 minute more, adding more cream if needed for spreading consistency.

Tinted Coconut:
1 bag coconut
food coloring of choice
1/2 cup confectioners' sugar (optional)

Put the coconut into a large mixing bowl. Add a few drops (2 or 3) of food coloring at a time and stir around with a fork. Continue to add food coloring until coconut is the desired color. Mix in confectioners' suger for extra sweetness.

Cheese Louise!


I have been eyeing Cheese Louise for a while now on Chiasso. She looks so fun. I am not usually a sucker for cutesy decor, but there is something aobut her I love! I think its her name... I was about to buy her when I noticed that she has gotten a bad review. It reads:

Dangerous Fun
This is a whimsical addition to any countertop. It is well constructed and works very well...a little too well. The problem I have with it is that the curved design makes it pedifficult to use without grating your knuckles. I have worked in kitchens for many years and have never hurt myself more than since I have owned this product.


Perhaps if I bought this it would be for decorative purposes only!

Thursday, January 17, 2008

Pretty Cupcakes!


While browsing Flickr, I came across Kylie Kambert's cupcakes. This woman is amazing! Her cupcakes are beautiful! The skill shown in her cupcakes photoset is something I definitely envy. She also has a great set with photos of very pretty and creative packaging.

Monday, January 14, 2008

Cheesecake Cookie Dip


I am not a huge fan of cheesecake, but the other day I was having a serious craving. I have been trying to watch what I eat, and watch what I spend so buying a cheesecake was out of the question! I have seen that cheesecake filling sold next to tthe cream cheese at the grocery store. I looked at the fat content and put it right back, 20 grams per serving! I bought a block of low fat cream cheese and decided to work with what ever else I had at home. This is what I cam up with:

1 8 oz package cream cheese
1/2 cup whipped cream
2 tbsp sour cream
1/4 cup sugar
1 tsp lemon juice

I used lowfat products and half sugar, half Splenda. The result was great! I dipped vanilla wafers in it. I will definitely be making this dip for my next party!

Ebay find gets a makeover!


I bought this stool on Ebay for $3.25 to go in my kitchen. My roommate painted the legs and covered it with a dishtowel from Target. It fits with the rest of the kitchen perfectly now! Thanks Erin!

Thursday, January 10, 2008

Foam Heart


My sister made this with the foam of her beer.

DIY Cupcake Stand


I wish I had found this back in October. I made the dessert table for Rotaract's Endless Summer Ball and was desperate for something like this. These are so cute and you can create one to match any occasion!

CakeJournal.com: How to make a cake stand for cupcakes or mini cakes

Wednesday, January 9, 2008

Obsessed with Etsy!

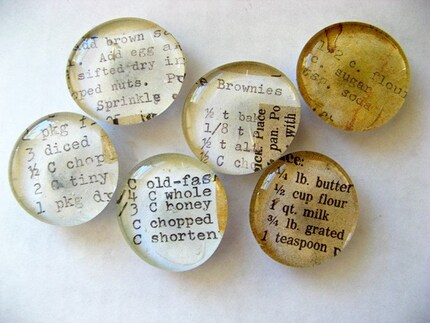
My wishlist on Etsy is huge, and grows bigger every day. These magnets are the newest addition to my wishlist!


Recipe Magnets

Tuesday, January 8, 2008

DIY Shag Rug


I always have some sort of craft project that I am working on. My latest one was also my inspiration for creating this site. I am making a rug for my living room! For months now, I have loved the idea of putting a shag rug in my living room. After a considerable amount of searching, I did not find anything that I was happy with and was also in my price range.
I took a trip to the craft store and picked up rug making net, a latch hook, and some white ponte. I chose the stretchy ponte because it looked like it would be durable and hold up to stains well. Also, it does not curl the way jersey does.
I cut the fabric into strips about a half inch thick and five inches long. After several attempts, I tossed the latch hook. The strips were too thick. I started looping the strips through by hand. It was hard at first, but after quite a few I got the hang of it.
I started noticing that my rug was too thick. I did not think that was possible. To thin it out a little I started a pattern. I would hook through two full rows, and on the third row I would skip three squares.
I am sure I will make a few more mistakes and find a few more tricks along the way.
There will definitely be more pictures of my rug and its progress posted very soon. This is my biggest DIY project ever and is surely going to take forever to finish!

Veggie Dip!


I am a HUGE fan of dips, but usually like ones that are paired with something fatty. While browsing Asian recipes a few days ago, I cam across this peanut butter dip/spread on Cooking Light. I have never enjoyed eating raw vegetables (outside of a salad) so much! I brought it to a family gathering before Christmas and it was a big hit! It is so tasty, good for you, and easy to make. I will certainly be making this one again and again!

I served mine as a veggie dip with carrots, red peppers, and celery. I also tried it as a sandwich. I used what I had in my fridge: carrots, cucumbers, cabbage, and onion. It was delicious, but next time I would try it with a bread that is toasted or not as soft.

1/2 cup natural-style peanut butter (such as Smucker's)
1/3 cup reduced-fat firm silken tofu
3 tablespoons light brown sugar
2 tablespoons fresh lime juice
2 tablespoons low-sodium soy sauce
1/2 to 3/4 teaspoon crushed red pepper
2 garlic cloves, crushed

Place all ingredients in a blender, and process until smooth, scraping sides. Store in an airtight container in refrigerator up to 2 days.

Yield: 1 cup (serving size: 2 tablespoons)

NUTRITION PER SERVING
CALORIES 122(57% from fat); FAT 7.7g (sat 1.5g,mono 3.8g,poly 2.5g); PROTEIN 5.4g; CHOLESTEROL 0.0mg; CALCIUM 19mg; SODIUM 131mg; FIBER 0.5g; IRON 0.4mg; CARBOHYDRATE 7.4g


Asian Peanut Butter Dip

Thursday, January 3, 2008

New Favorite!

Over the holidays I tried a new cookie recipe that I have fallen in love with! I got the idea to make espresso chocolate chip cookies. I found a recipe on FoodNetwork.com that turned out amazing. They are not like typical chocolate chip cookies. You cannot taste the espresso at all, which was surprising (I added extra). But the outside was similar to a meringue shell, and the inside was soft. They also did not spread out weird like other recipes I have tried. Here they are:

1/2 cup (1 stick) butter, softened
1 cup light brown sugar
3 tablespoons granulated sugar
1 large egg
2 teaspoons vanilla extract
1 3/4 cups all-purpose flour
1/2 teaspoon baking powder
1/2 teaspoon baking soda
1/2 teaspoon salt
1 1/2 teaspoons instant espresso coffee powder
1 1/2 cups semisweet chocolate chips

Preheat oven to 300 degrees F.
Cream the butter with the sugars using an electric mixer on medium speed until fluffy, approximately 30 seconds. Beat in the egg and the vanilla extract for another 30 seconds.

In a mixing bowl, sift together the dry ingredients and beat into the butter mixture at low speed for about 15 seconds. Stir in the espresso coffee powder and chocolate chips.

Using a 1-ounce scoop or a 2-tablespoon measure, drop cookie dough onto a greased cookie sheet about 3 inches apart. Gently press down on the dough with the back of a spoon to spread out into a 2-inch circle. Bake for about 20 minutes or until nicely browned around the edges. Bake a little longer for a crispier cookie.